Showing posts with label how. Show all posts
Showing posts with label how. Show all posts
How To Rotate A Video In VLC With 6 Easy Steps Picture Help
Getting some problem in your video ? or maybe you just captured the video from iPhone, Samsung, Sony, Tablet, or Smartphones with wrong video degrees and now you want to rotate that video in VLC without any software or without doing too much work on that ?
So then here is the best and easily solution with pictures help where you can read and see that how can i rotate video in VLC.
Note: You should update your vlc or download the latest VLC player from Here.
Step 1: Open VLC & Select Tools (Video Must Be Open In VLC)
.png)
Step 2: Select Effects and Filters
.png)
Step 3: Click On Video Effects
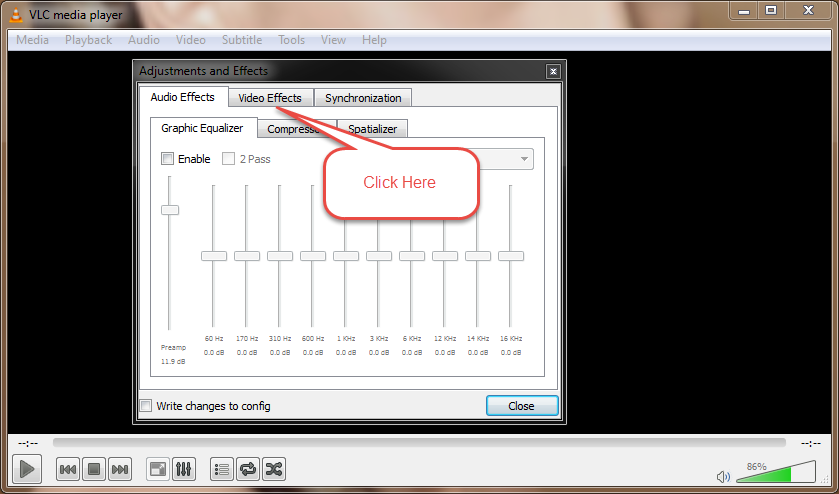.png)
Step 4: Click On Geometry
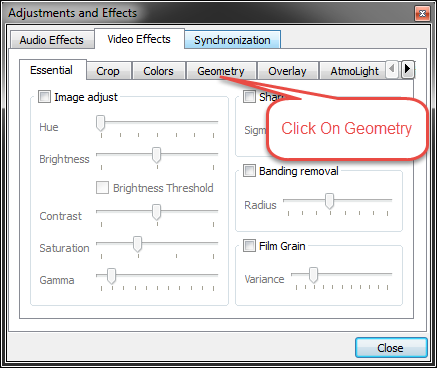.png)
Step 5: Check Box (Rotate)
.png)
Step 6: Now Last Step Just Move This Angel & Youre Done!
.png)


Read more »
So then here is the best and easily solution with pictures help where you can read and see that how can i rotate video in VLC.
Note: You should update your vlc or download the latest VLC player from Here.
Step 1: Open VLC & Select Tools (Video Must Be Open In VLC)
Step 2: Select Effects and Filters
Step 3: Click On Video Effects
Step 4: Click On Geometry
Step 5: Check Box (Rotate)
Step 6: Now Last Step Just Move This Angel & Youre Done!
If you have face any problem to rotate your video in vlc then please im here to help you. Thanks!

How To Download Old Skype Version For Xp

If you are looking for skype old version for xp home, professional and premium then pleasure to share everything with you here on my site. You just need to click on following link and download the old skype version for your Xp Window and you can enjoy the free video and audio calling from skype. :)
Download Skype Old Version: Here
If you face any problem then please comment here and i will make another solution for you. Thanks !!
How To Add Rel Publisher Tag On Wordpress Blogger Easy
Internet has everything, you enter single word in a search engine and you experience millions of applicable pages. Yet, a normal client has constrained time and consideration so your website search better be distinctive and appealing. That is precisely what rel=publisher tag will accomplish for your brand.

Actually im not going to make this article so long and difficult for people to understand what is actually Rel=Publisher tag or why we use this on our website to connect with Google+ Page.
Now im showing you the two example with different view.
Read more »
Actually im not going to make this article so long and difficult for people to understand what is actually Rel=Publisher tag or why we use this on our website to connect with Google+ Page.
Now im showing you the two example with different view.
Example 1 With Rel=Publisher Tag On Website/Blog
 |
| Source/Credit Image: Google |
Example 2 Without Rel=Publisher Tag On Website/Blog
 | |
|
So what are you thinking ? still want to know why we should add this tag to our website/blogs ? No way.
Follow steps to add this on your website
Blogger:
Step 1: Go To Blogger
Step 2: Select Your Blog
Step 3: Click On Template
Step 4: Edit HTMl
Step 5: Find <head>
Step 6: Add following code below <head> code.
Code: <link href="https://plus.google.com/{plusPageUrl}" rel="publisher" />
Example
 |
| Click To Full View |
Note: I You can also connect your site by simply linking to your Google+ page anywhere on the page using a standard <a> element and include the rel="publisher" attribute on the link.
Important Notes: If you already connected your website on your Google+ Page then ignore this line but if you didnt add then follow the official article by Google Here
for more details visit Google+ Developers page.
Wordpress:
Step 1: Go To YourWesbite.Com/login.php
Step 2: Login With Your Username & Password
Step 3: Just Go To Plugins
Step 4: Search For Yoast SEO
Step 5: Install It
Step 6: Nevigate To Yoast SEO
Step 7: Click Social
Step 8: Google+ tab, paste the url of your Google+ page.
Save settings and youre done.
Step 9: You can also add the following code and save <a href="https://plus.google
Code: <link href="https://plus.google.com/{plusPageUrl}" rel="publisher" />
Leave comments for feedback/suggestions or help. Thanks
How To Extract All Images From PDF In Adobe Acrobat Xi Pro 2 Step Only
How To Export Pictures From PDF File Easily & Fast (Only For Adobe X Readers).
- Open The (PDF) File In Adobe Acrobat
- Choose Tools >> Document Processing >> Export All Images.
.png)
Note: If you cant find the Document Processing then click on right side icon ill show you the screenshots below and just check the Document Processing and thats it.

Have any problem with these steps !?
Please feel free to comment here below.
How To Share Your Printer With Other Computers Connected To Your Network
Work with your printe while your other computers connected to your network. If you have a printer attached to your computer, you can share it with anyone on the same network. It doesnt matter what type of printer you have, as long its installed on your computer and is directly attached with a USB cable or other type of printer cable. The people you choose to share the printer with will be able to use it to print, as long as they first locate your computer on the network.
Printers that are directly connected to a network rather than attached to a computer are available to anyone on the same network. Such printers must have a network port or wireless connection that allows them to connect directly to the network.
 |
| Image Credit: WikiHow |
Sharing a printer requires a few steps. First, on the computer that the printer is plugged in to, follow these steps.
To turn on file and printer sharing
- Open Advanced sharing settings by clicking the Start button
, and then clicking Control Panel. In the search box, typenetwork, click Network and Sharing Center, and then, in the left pane, click Change advanced sharing settings.
- Click the chevron
to expand the current network profile.
- If printer sharing is off, under File and printer sharing, select Turn on file and printer sharing, and then click Save changes.
If youre prompted for an administrator password or confirmation, type the password or provide confirmation.
Now you need to share the printer itself.
To share your printer
- Open Devices and Printers by clicking the Start button
- Right-click the printer you want to share, and then click Printer properties.
- Click the Sharing tab, and select the Share this printer check box.
Other people on your network can now connect to this printer. All they need to do is add a network printer (your printer) to their computers.
To add a network printer
- Open Devices and Printers by clicking the Start button
- Click Add a printer.
- Click Add a network, wireless, or Bluetooth printer, click the shared printer, click Next, and follow the instructions on the screen.
Source/Reference:
Microsoft Post Explained Here
How To Display HTML CSS or JavaScript Code In Blogger Posts
If you want to show HTML, CSS, JavaScript, or PHP Codes with Syntax Highlighter in your blogger posts with some beautiful styles, tables & with your logo then the problem is solved because im going to show you how can you do this easily and fast on your blog. Actually its original name is (Code Highlighter) or you can call (Syntax Highlighter). Sometime people want to insert HTML, CSS code directly into blogger post but they get an error message that you cant do this in HTML post editor. But dont you worry everything is possible here.
9: Its work only in normal (Compose) area dont change to HTML editor in blogger posts.
Read more »
How To Insert CSS, JavaScript, HTML Codes In Blogger Posts? its the most common question asked by blog owners especially when theyre working on codes or running tech site to showing widgets codes in blogger posts.
So today i will show you how to do with some easy steps and make your codes more stylish in box,
In short as you know i love to share unique & long information with short tricks. I hate to waste your or mine time here so lets get to the point,
I know you love to see Demo so im going to show here below,
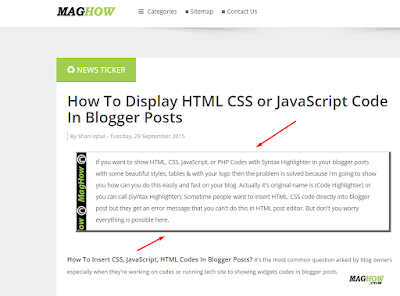
Follow my steps,
1: Go To Blogger
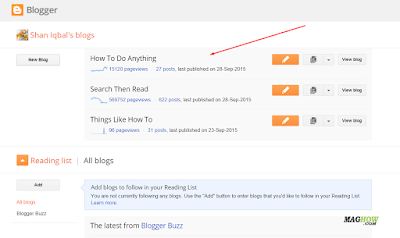
2: Select Your Blog
3: Click Templates
4: Select (Edit HTML)
5: Click Anywhere In HTML Just Press CTRL + F & Find ]]></b:skin> Code Like Below In Example Picture
6: Past Below Code Above ]]></b:skin> Just Like In Example Picture Below,
Code:
7: Now Go To Posts
I know you love to see Demo so im going to show here below,
Demo
Follow my steps,
1: Go To Blogger
2: Select Your Blog
3: Click Templates
 |
| Picture Help / Example |
4: Select (Edit HTML)
 |
| Picture Help / Example |
5: Click Anywhere In HTML Just Press CTRL + F & Find ]]></b:skin> Code Like Below In Example Picture
 |
| Picture Help / Example |
6: Past Below Code Above ]]></b:skin> Just Like In Example Picture Below,
Code:
.post blockquote {
background: #C8EFFF url(https://blogger.googleusercontent.com/img/b/R29vZ2xl/AVvXsEj8OWUfnA4lXkLBa_0V35nk5l4cRMcYRpjcAI9YEmoQFWcZnTPvgSdqMVICMdjlyGtVtZuUcOi-jgDmsKDrVJ2h-LITN8uzTB_Zi2hdU7F-dopi1zzM8Z7r1zlG3kBShHY1Sq2MSgQRpYU/h120/Copyright+Logo+For+HTMl+Code+Highlighter.png);
background-position:top left;
background-repeat:repeat-y;
margin: 0 20px;
padding: 10px 20px 10px 45px;
border-top: 2px solid #DDD;
border-right: 5px solid #666;
border-left: 2px solid #DDD;
border-bottom: 5px solid #666;
font-size: 0.9em;
}
.post blockquote p {
margin: 0;
padding: 0 0 15px;
}
.blockquote {
font: 18px normal sans-serif,Tahoma;
padding-top: 10px;
margin: 5px;
text-indent: 65px;
}
.blockquote div {
display: block;
padding-bottom:10px;
}
.blockquote p {
margin: 0;
padding-top:10px;
}
 |
| Picture Help / Example |
7: Now Go To Posts
 |
| Picture Help / Example |
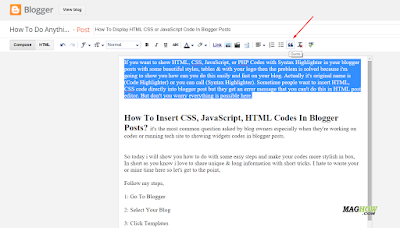
8: Select Any Text You Want To Show In Stylish Box & Click (Quote) Button Like Below In Picture.
 |
| Picture Help / Example |
9: Its work only in normal (Compose) area dont change to HTML editor in blogger posts.
Customization
10: Change Yellow Highlight URL From Step 6 With Your Own (c) Copyright Image,
Note: If you dont want to show image just remove URL and keep it simple without image.
11: Change Red Highlight Color From 6 Step Code & Its Background Color Select Your Favorite Color.
Note: I will recommend you to keep it white color like its in demo version.
Leave comments for suggestions/feedback or If you are facing any problem just let me know so that I could help. Stay tuned for upcoming posts like this. Peace and blessings :)
How Do I Create Copyright c Symbol In Any Adobe Photoshop Windows Mac
its pretty easy to add copyright (c) or any symbol in Adobe Photoshop, CS4, CS5, CS6, CC & so on. You just need to put some words or just go to tools menu to get it. Im going to show you below how can you get these symbols or any others.

Actually there is 4 ways to add copyright symbol in Adobe Photoshop in my experience,
Follow these steps,
Method 1:
1: Open Adobe Photoshop
2: Open Any Image or Your Work Place On Adobe
3: Press & Hold ALT Button & Type 0169 ©
Note: Its Working On My Adobe Photoshop CC.
Method 2: Windows & Mac
Its Easy, Fast & Within Second
Copy The Following (c) Copyright Symbol & Past It Wherever You Want.
Copy This: ©
Method 3: Windows
So Photoshop has no Glyph panel so you cant add these but you can add by following steps,
1: Windows PC
4: Select Copyright or Any Symbol & Click Copy

4: Past Copied Symbol Into Adobe Photoshop

5: Youre Done!
Note: You can also past this symbol anywhere on website or even in documents.
Method 4: Windows & Mac


Read more »
Actually there is 4 ways to add copyright symbol in Adobe Photoshop in my experience,
Follow these steps,
Method 1:
1: Open Adobe Photoshop
2: Open Any Image or Your Work Place On Adobe
3: Press & Hold ALT Button & Type 0169 ©
Note: Its Working On My Adobe Photoshop CC.
Method 2: Windows & Mac
Its Easy, Fast & Within Second
Copy The Following (c) Copyright Symbol & Past It Wherever You Want.
Copy This: ©
Method 3: Windows
So Photoshop has no Glyph panel so you cant add these but you can add by following steps,
1: Windows PC
2: Go To Start Menu Windows 7/8/10
3: Search (Character Map)
 |
| Picture Help & Example |
3: Search (Character Map)
 | |
|
Note: You can also past this symbol anywhere on website or even in documents.
Method 4: Windows & Mac
Its different from all above methods and so much easy because you dont need to visit any website, folder, or search something for this symbol because its already in Adobe Photoshop, follow my steps please,
1: Launch Photoshop
2: Go To Shape Tools
3: Select Custom Shape
4: Select Shape From Menu
5: Select (c) Copyright Symbol
6: Draw Your (c) Copyright Symbol On Page
7: Youre Done!
Final words for my visitors, if you feel any trouble during these steps dont be shy just freely comment on this post or contact me directly from contact page.
Leave comments for feedback/suggestions or help. Thanks
